Knative 实践:从源代码到服务的自动化部署
通過之前的文章,相信大家已經熟悉了 Serving、Eventing 以及 Tekton。那么在實際使用中,我們往往會遇到一些復雜的場景,這時候就需要各個組件之間進行協作處理。例如我們提交源代碼之后是否直接可以部署服務到 K8s 中? 這個場景對于用戶來說很有吸引力。那么現在就讓我們來看一下,在 Knative 中如何實現從代碼到服務?
場景介紹
現在的場景是這樣的:代碼構建->事件驅動->服務部署。那么對應到 Knative 中,需要 Eventing、Tekton 和 Serving 一起協作來實現這個場景。
準備
-
部署 Knative。參考在阿里云容器服務上部署 Knative;
-
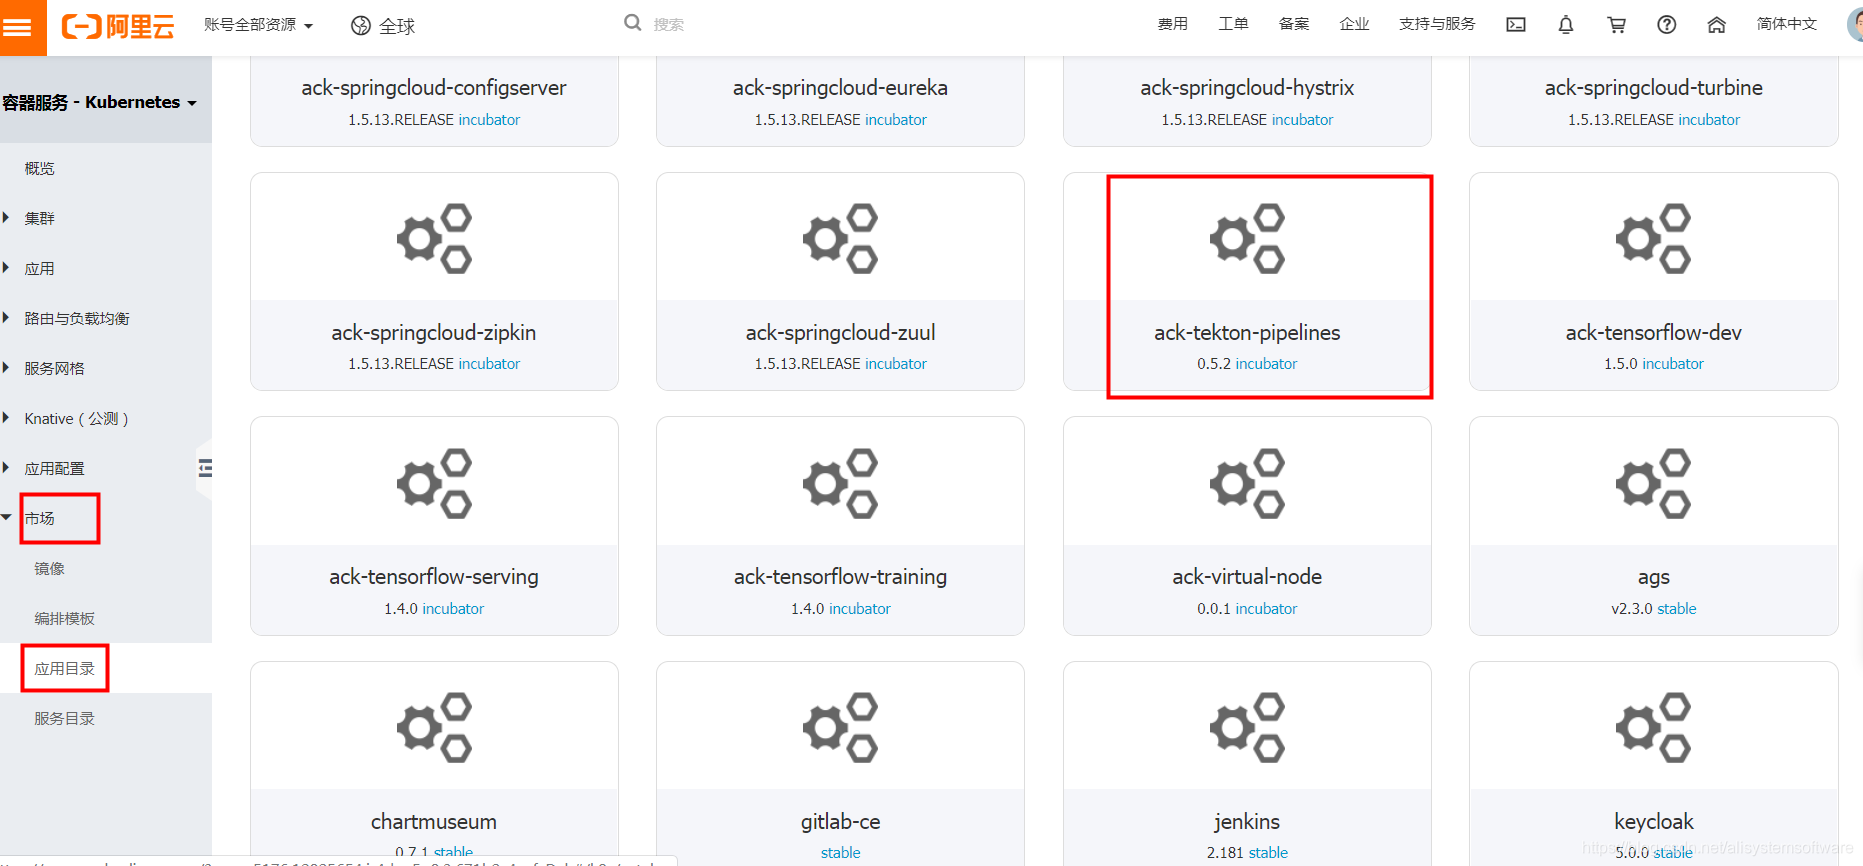
部署 Tekton。通過阿里云容器服務控制臺,應用目錄選擇 ack-tekton-pipelines 進行安裝部署 Tekton;
 -
部署 GitHub 事件源。阿里云容器服務控制臺 Knative 組件管理中選擇安裝 GitHub 組件,如圖所示:
從源代碼到服務
- 修改分支代碼,提交 merge request 合并到 master 分支;
- Eventing 監聽到 merge 事件,發送給 GitHub Trigger 服務;
- GitHub Trigger 服務接收事件, 通過 Tekton 執行代碼構建和并通過 deployer 執行服務部署。GitHub Trigger 的作用就是解析 GitHub 事件的詳細信息,然后轉換成 Tekton 資源并且提交到 Kubernetes 中執行 Pipeline。項目地址:https://github.com/knative-sample/tekton-serving。 這個項目中有兩個部分: Trigger 和 Deployer,Trigger 的作用是解析 github 事件, 并提交 PipelineRun 定義。Deployer 的作用就是更新 Service 的鏡像信息。github source pull_request body 的關鍵內容如下:
- action 表示當前的 pull request 事件細節。創建 pull request 時 action 是 opened ,關閉 pull request 時 action 就是 closed;
- merge_commit_sha 可以獲得 merge commit 的 id;
- base.ref 可以獲得 merge request 發生在哪個分支上。
本文涉及到的代碼與資源文件地址:
- GitHubTrigger 和 Deployer:https://github.com/knative-sample/tekton-serving
- 部署示例文件:https://github.com/knative-sample/eventing-tekton-serving
接下來我們開始一步步搞起。
部署 Tekton 服務
我們看一下創建代碼構建 Task 和 部署服務Task。
代碼構建Task:
apiVersion: tekton.dev/v1alpha1 kind: Task metadata:name: source-to-image spec:inputs:resources:- name: git-sourcetype: gitparams:- name: pathToContextdescription: The path to the build context, used by Kaniko - within the workspacedefault: .- name: pathToDockerFiledescription: The path to the dockerfile to build (relative to the context)default: Dockerfile- name: imageUrldescription: Url of image repository- name: imageTagdescription: Tag to apply to the built imagedefault: "latest"steps:- name: build-and-pushimage: registry.cn-hangzhou.aliyuncs.com/knative-sample/kaniko-project-executor:v0.10.0command:- /kaniko/executorargs:- --dockerfile=${inputs.params.pathToDockerFile}- --destination=${inputs.params.imageUrl}:${inputs.params.imageTag}- --context=/workspace/git-source/${inputs.params.pathToContext}env:- name: DOCKER_CONFIGvalue: /builder/home/.docker這里通過 deployer-deployer 執行服務部署,部署服務Task:
apiVersion: tekton.dev/v1alpha1 kind: Task metadata:name: image-to-deploy spec:inputs:resources:- name: git-sourcetype: gitparams:- name: pathToYamlFiledescription: The path to the yaml file to deploy within the git source- name: imageUrldescription: Url of image repository- name: imageTagdescription: Tag of the images to be used.default: "latest"steps:- name: deployimage: "registry.cn-hangzhou.aliyuncs.com/knative-sample/deployer-deployer:7620096e"args:- "--namespace=default"- "--serivce-name=hello-sample"- "--image=${inputs.params.imageUrl}:${inputs.params.imageTag}"另外需要設置一下鏡像倉庫的 secret:
apiVersion: v1 kind: Secret metadata:name: ack-cr-push-secretannotations:tekton.dev/docker-0: https://registry.cn-hangzhou.aliyuncs.com type: kubernetes.io/basic-auth stringData:username: <cleartext non-encoded>password: <cleartext non-encoded>執行如下命令:
# Create Pipeline kubectl apply -f tekton/pipeline/build-and-deploy-pipeline.yaml# Create PipelineResource kubectl apply -f tekton/resources/picalc-git.yaml# Create image secret kubectl apply -f tekton/image-secret.yaml# Create task: soruce to image kubectl apply -f tekton/tasks/source-to-image.yaml# Create task: deploy the image to cluster kubectl apply -f tekton/tasks/image-to-deployer.yaml
部署 Knative Serving 服務
先創建 deployer-github-trigger 服務,用于接收 GitHub 事件,并觸發 Tekton Pipeline 構建任務。其中 service.yaml 如下:
apiVersion: serving.knative.dev/v1alpha1 kind: Service metadata:name: deployer-github-trigger spec:template:spec:containers:- image: registry.cn-hangzhou.aliyuncs.com/knative-sample/deployer-trigger:tekton-v1_74647e3a-20190806093544args:- --trigger-config=/app/config/deployer-trigger.yamlvolumeMounts:- name: config-volume mountPath: /app/configserviceAccountName: tektonvolumes:- name: config-volume configMap:name: deployer-trigger-configitems:- key: deployer-trigger.yamlpath: deployer-trigger.yaml這里通過 ConfigMap deployer-trigger-config, 設置 PipelineRun。deployer-github-trigger 能根據 github Event 信息獲取代碼倉庫的最新信息但不能自動決定 PipelineRun 的定義,所以需要指定一個 PipelineRun 的模板。Trigger 通過 --trigger-config 參數指定 PipelineRun 的模板, 模板內容如下:
apiVersion: v1 kind: ConfigMap metadata:name: deployer-trigger-confignamespace: default data:"deployer-trigger.yaml": |-apiVersion: tekton.dev/v1alpha1kind: PipelineRunmetadata:name: tekton-kn-samplespec:pipelineRef:name: build-and-deploy-pipelineresources:- name: git-sourceresourceRef:name: eventing-tekton-serving-gitparams:- name: pathToContextvalue: "src"- name: pathToYamlFilevalue: ""- name: imageUrlvalue: "registry.cn-hangzhou.aliyuncs.com/knative-sample/eventing-tekton-serving-helloworld"- name: imageTagvalue: "1.0"trigger:type: manualserviceAccount: pipeline-account執行命令如下:
# Create clusterrole kubectl apply -f serving/clusterrole.yaml# Create clusterrolebinding kubectl apply -f serving/clusterrolebinding.yaml# Create serviceaccount kubectl apply -f serving/serviceaccount.yaml# Create configmap kubectl apply -f serving/configmap.yaml# Create service kubectl apply -f serving/service.yaml
配置 Eventing 中 GitHub 事件源
代碼 merge request 會觸發對應的事件,通過 Knative Eventing 獲取到事件之后直接將事件發送給 deployer-github-trigger 服務。
創建 GitHub Token
創建 Personal access tokens, 用于訪問 GitHub API。另外你的代碼將使用它驗證來自 github 的傳入 webhook(secret token)。token 的名稱可以任意設置。Source 需要開啟 repo:public_repo 和 admin:repo_hook , 以便通過公共倉庫觸發 Event 事件,并為這些公共倉庫創建 webhooks 。
下面是設置一個 “GitHubSource Sample” token 的示例。
更新 githubsecret.yaml 內容。如果生成的是 personal_access_token_value token, 則需要設置 secretToken 如下:
apiVersion: v1 kind: Secret metadata:name: githubsecret type: Opaque stringData:accessToken: personal_access_token_valuesecretToken: asdfasfdsaf執行命令使其生效:
kubectl apply -f eventing/githubsecret.yaml
創建 GitHub 事件源
為了接收 GitHub 產生的事件, 需要創建 GitHubSource 用于接收事件。
apiVersion: sources.eventing.knative.dev/v1alpha1 kind: GitHubSource metadata:name: deployer-github-sources spec:eventTypes:- pull_requestownerAndRepository: knative-sample/eventing-tekton-servingaccessToken:secretKeyRef:name: githubsecretkey: accessTokensecretToken:secretKeyRef:name: githubsecretkey: secretTokensink:apiVersion: serving.knative.dev/v1alpha1kind: Servicename: deployer-github-trigger關鍵字段解釋:
- 指定 github 倉庫:ownerAndRepository: knative-sample/eventing-tekton-serving 表示監聽 https://github.com/knative-sample/eventing-tekton-serving 倉庫的事件;
- 事件類型:eventTypes 是一個數組,這個數組中可以配置 github 事件列表;
- 認證信息:accessToken 和 secretToken 是通過 secret 引用 github 倉庫的認證信息;
- 目標 Service:sink 字段表示接收到的事件需要發送到哪個 Service , 這里是直接發送到前面定義的 deployer-github-trigger 服務。
執行 kubectl 命令:
kubectl apply -f eventing/github-source.yaml如果集群中開啟了 Istio 注入,需要開啟 egress 訪問:
kubectl apply -f eventing/egress.yamldeployer-github-sources 提交到 Kubernetes 之后,github source controller 會在 http://github.com/knative-sample/eventing-tekton-serving 下創建一個 webhook,回調地址就是我們的 github_receive_adapter 服務公網地址。
當 http://github.com/knative-sample/eventing-tekton-serving 有 pull request 發生時就會自動觸發 deployer-github-trigger 的執行,deployer-github-trigger 首先編譯鏡像,然后更新 hello-sample service 鏡像,從而完成自動化發布。
代碼->鏡像->服務
下面我們演示一下從代碼到服務,自動化構建和部署過程:
服務訪問體驗地址:http://hello-sample.default.serverless.kuberun.com
結論
從代碼到服務,通過上面的示例,Knative 是否給你帶來了不一樣的體驗?希望通過 Knative 給你帶來更輕松的代碼構建和服務部署,讓你更專注于業務本身。歡迎對 Knative 有興趣的一起交流。
歡迎加入 Knative 交流群
總結
以上是生活随笔為你收集整理的Knative 实践:从源代码到服务的自动化部署的全部內容,希望文章能夠幫你解決所遇到的問題。

- 上一篇: Kubernetes 弹性伸缩全场景解析
- 下一篇: 云原生生态周报 Vol. 14 | K8